10 minutes reading time
I wanted to take a swing at hacking IoT hardware for some time now. I've watched a lot of Matt Brown's hardware hacking videos and eventually realized that I already had a basic understanding of what he's doing and why he's doing it. Then, couple months ago I discovered the Hardware Hacking Wiki which had step-by-step guides on each part of the hacking process. So I felt like I was equipped enough to go through some online marketplaces and find something that I could open up to see what I could do.
With my limited tool set I knew that I wouldn't be able to pick up any device. I was going to need a device that had a UART or debug port for me to plug in to. I started searching through marketplaces for devices that had radios in them such as Wifi, or Bluetooth. This is because, to the best of my knowledge, in the US devices that emit Radiating Frequencies (RF) are required to be tested by the FCC. This is to ensure the respective radios in the device operate only in their approved frequency range and power levels in the radio spectrum. With these tests come the test reports which are documented online. These test reports include photos of the device disassembled. This is where I would see if a device had a proper UART port.
It only took me about 10 minutes to find a device, after finding one other device and looking up it's FCCID to find that the board didn't have any UART-looking port or pads. The device I found was the owlet baby cam Thankfully the seller had uploaded a photo of the bottom where the regulatory labels were.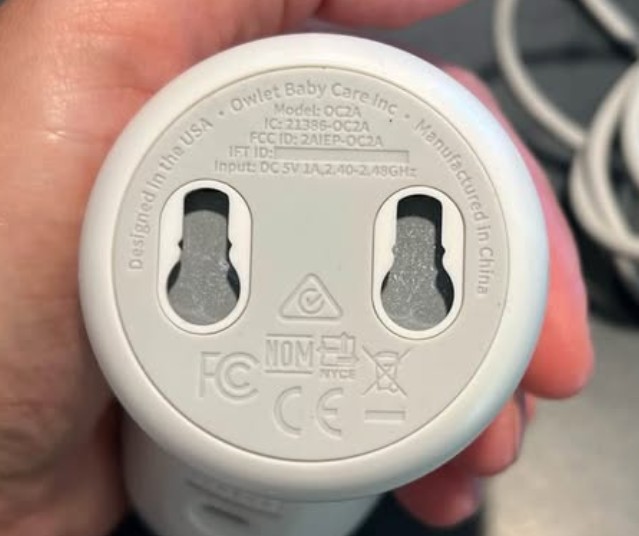
Looking up the FCCID I was able to find that the mainboard not only had a UART port, but the manufacturer had also graciously labeled the transmit, receive, and ground pads.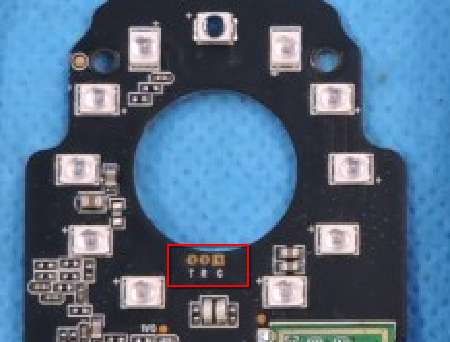
I messaged the seller and arranged for pickup. The following weekend I took the camera apart and got ready to get a connection going over this UART port.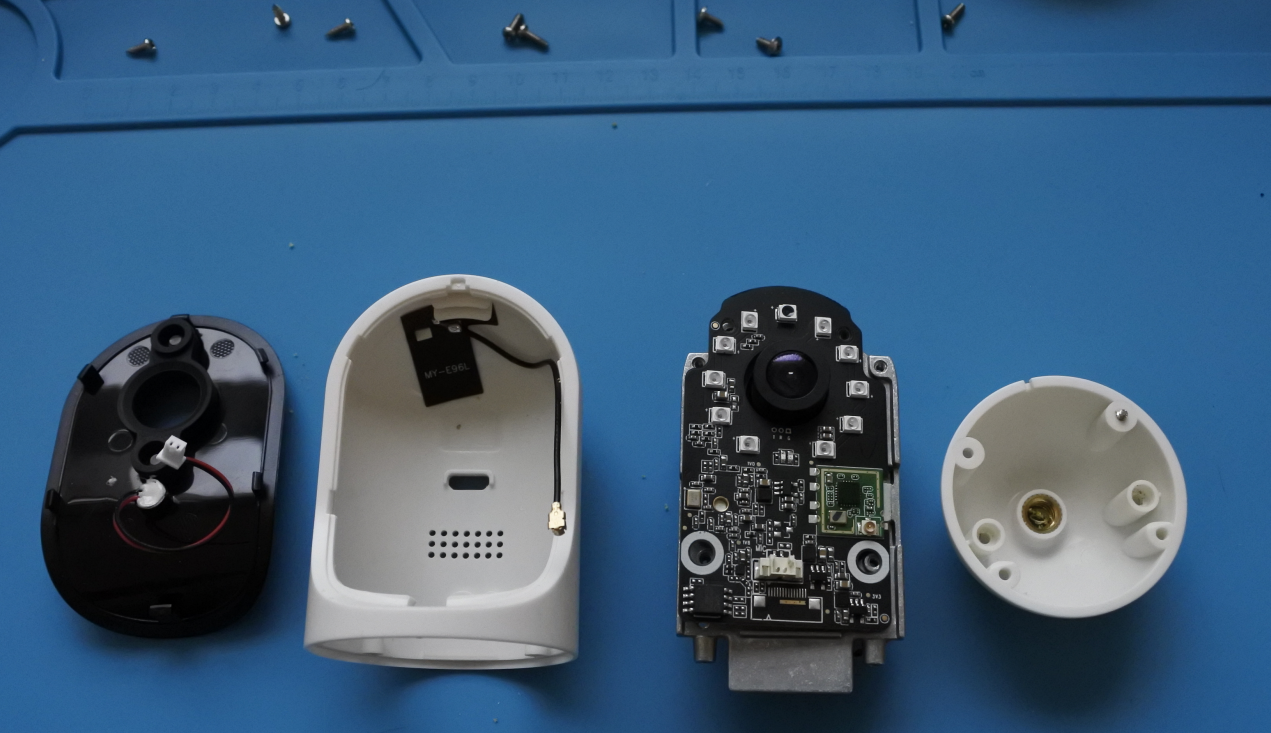
Unfortunately I didn't consider the gauge of the through holes when I noticed the UART port in the FCC report. My jumper wires were too big to go through so my first attempt was to solder the through holes and pins of the jumper wires before attempting to solder them together. This worked ok until I realized I needed to connect this board to the other board of the device (see FCC report photos) and the wires were in the way of the camera lens.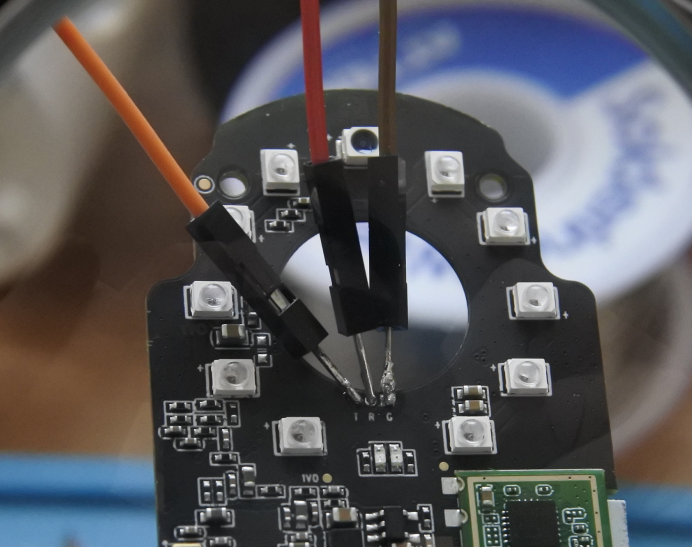
After using a solder wick to get the solder out of the through holes the best I could, I sifted through my bins and found some tiny resistors with wires thin enough to go into these through holes. I cut the resistor's wires into 3 pieces, applied solder to them and then solder the into the through holes. Then I soldered the jumper wires to the wires on the new pins board. Now I could partially reassemble everything back together to get communication to this UART port.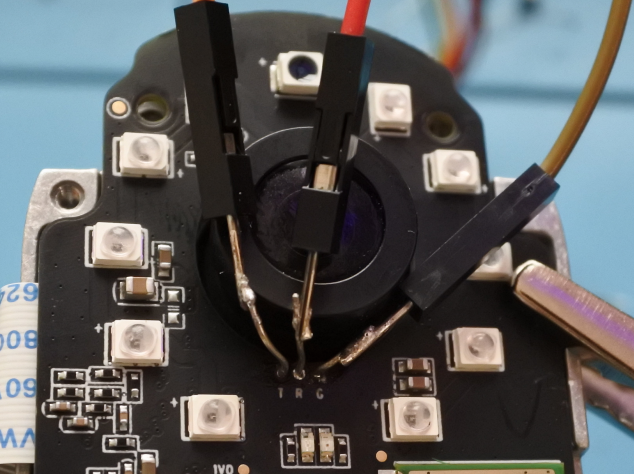
Then I hooked things up to my laptop, installed picocom onto my system and plugged the device in.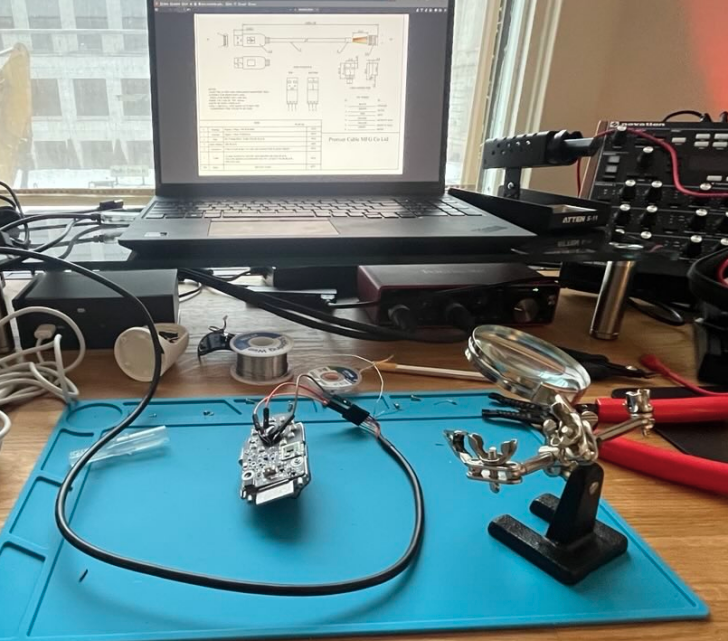
After messing around with permissions for the USB's /dev/ entry I was able to get picocom reading the serial port of my cable. I also got the baud rate right on the first try, 115200. I was now viewing the debug / boot info of the device when it first turns on.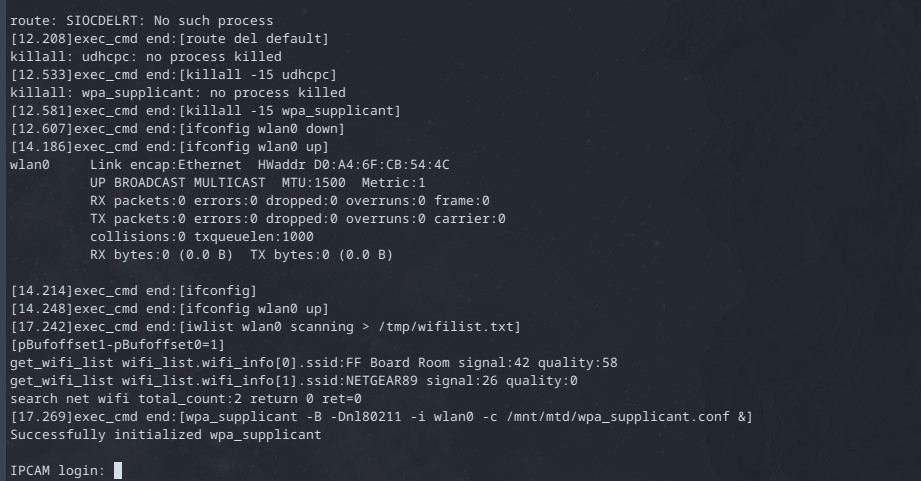
Here is the first startup section of the boot process where U-Boot gets initialized
WARNING: Caches not enabled
MMC:   MStar SD/MMC: 0
nor_flash_mxp allocated success!!
!!!!!!!!!!!!!!!!!!!!!!!!!!!!!!!!!!!!!!!!!!!!!!!!!!!!!!!!!!!!!!
Unknown flash type (0x20, 0x40, 0x18) and use default flash type
please add flash info to serial flash driver
!!!!!!!!!!!!!!!!!!!!!!!!!!!!!!!!!!!!!!!!!!!!!!!!!!!!!!!!!!!!!!
SF: Detected nor0 with total size 16 MiB
MXP found at mxp_offset[3]=0x00020000, size=0x1000
env_offset=0x4F000 env_size=0x1000
!!!!!!!!!!!!!!!!!!!!!!!!!!!!!!!!!!!!!!!!!!!!!!!!!!!!!!!!!!!!!!
Unknown flash type (0x20, 0x40, 0x18) and use default flash type
please add flash info to serial flash driver
!!!!!!!!!!!!!!!!!!!!!!!!!!!!!!!!!!!!!!!!!!!!!!!!!!!!!!!!!!!!!!
SF: Detected nor0 with total size 16 MiB
In:    serial
Out:   serial
Err:   serial
Net:   Net Initialization Skipped
No ethernet found.
_[sdmmc_0] Card Detect Fail!
** Bad device mmc 0 **
Hit Ctrl+c key to stop autoboot:  0
Once started we get some details about the kernel file.
gpio debug MHal_GPIO_Pad_Set:603 u32IndexGPIO:77
gpio[77] is 1
gpio debug MHal_GPIO_Pad_Set:603 u32IndexGPIO:76
gpio[76] is 0
gpio debug MHal_GPIO_Pad_Set:603 u32IndexGPIO:61
gpio[61] is 0
!!!!!!!!!!!!!!!!!!!!!!!!!!!!!!!!!!!!!!!!!!!!!!!!!!!!!!!!!!!!!!
Unknown flash type (0x20, 0x40, 0x18) and use default flash type
please add flash info to serial flash driver
!!!!!!!!!!!!!!!!!!!!!!!!!!!!!!!!!!!!!!!!!!!!!!!!!!!!!!!!!!!!!!
SF: Detected nor0 with total size 16 MiB
SF: 2097152 bytes @ 0x50000 Read: OK
##  Booting kernel from Legacy Image at 22000000 ...
  Image Name:   MVX4##I6B0g#######KL_LX409##[BR:
  Image Type:   ARM Linux Kernel Image (lzma compressed)
  Data Size:    1948364 Bytes = 1.9 MiB
  Load Address: 20008000
  Entry Point:  20008000
  Verifying Checksum ... OK
  Uncompressing Kernel Image ...
[XZ] !!!reserved 0x21000000 length=0x 1000000 for xz!!
  XZ: uncompressed size=0x3da000, ret=7
OK
atags:0x20000000
Then the kernel gets initialized
Starting kernel ...

Booting Linux on physical CPU 0x0
Linux version 4.9.84 (aoni@Owen) (gcc version 4.9.4 (Buildroot 2017.08-gc7bbae9-dirty) ) #23 PREEMPT Tue Nov 10 17:47
:19 CST 2020
CPU: ARMv7 Processor [410fc075] revision 5 (ARMv7), cr=50c53c7d
CPU: div instructions available: patching division code
CPU: PIPT / VIPT nonaliasing data cache, VIPT aliasing instruction cache
early_atags_to_fdt() success
OF: fdt:Machine model: INFINITY6B0 SSC009A-S01A QFN88
LXmem is 0x3fe0000 PHYS_OFFSET is 0x20000000
Add mem start 0x20000000 size 0x3fe0000!!!!

LX_MEM  = 0x20000000, 0x3fe0000
LX_MEM2 = 0x0, 0x0
LX_MEM3 = 0x0, 0x0
EMAC_LEN= 0x0
DRAM_LEN= 0x0
deal_with_reserve_mma_heap memblock_reserve success mma_config[0].reserved_start=
0x22de0000
Once everything is done with the power up and boot sequence, the device lands on a login prompt. I tried the standard username and password combinations, root / password, admin / admin, admin / password etc. But none of those worked so I went ahead and sifted through the kernel and boot messages and was able to identify the bootloader as U-boot.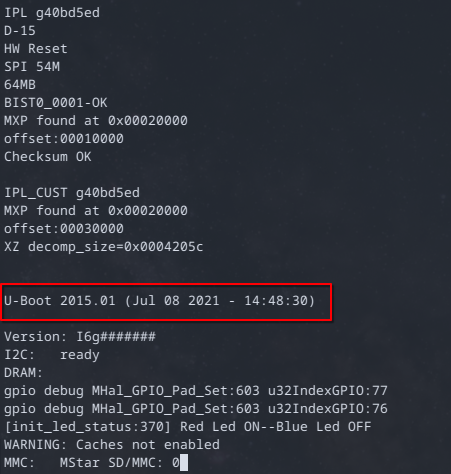
Thankfully not too far down form this line were instructions on how to stop the autoboot feature!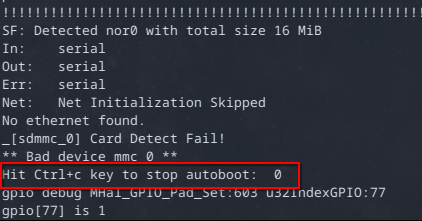
While holding down ctrl+C before the device is plugged in and powered, the device booted up and instantly dropped me to a shell. This shell wasn't the device's OS, so I didn't have normal commands, or filesystem / environment, to work with. I went over to the hardware hacking discord and asked for some guidance on next steps. To get some more info they had asked to see the output of the help command and suggested a couple things but their suggestion of using printenv to get the environment variables reminded me that the init variable can be used to trigger a shell instead of the startup process or script of the device.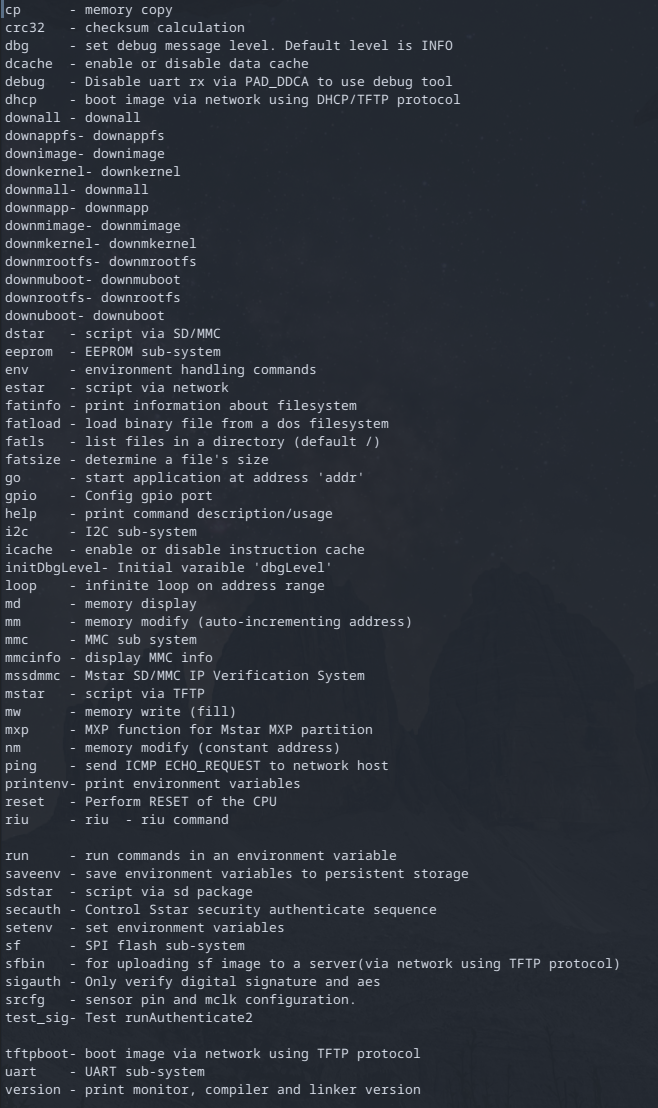
SigmaStar # printenv
baudrate=115200 bootargs=console=ttyS0,115200 root=/dev/mtdblock2 rootfstype=squashfs ro init=/linuxrc LX_MEM=0x3fe0000 mma_heap=mma_heap_name0,miu=0,sz=0x1200000 bootcmd=gpio out 77 1;gpio out 76 0;gpio out 61 0;sf probe 0;sf read 0x22000000 0x50000 0x200000; bootm 0x22000000 bootdelay=0 stderr=serial stdin=serial stdout=serial Environment size: 346/4092 bytes
Using the printenv command we can see the init=/linuxrc section. Now with the setenv command we can replace the init=/linuxrc with init=/bin/sh.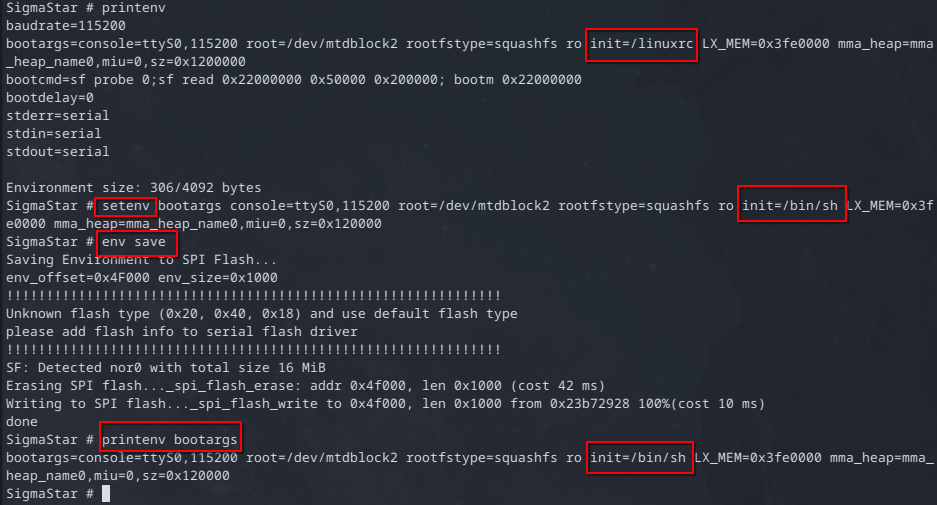
With this environment variable set to a shell, the next boot up sequence should start a shell instead of running /linuxrc. So I unplugged and plugged the USB cable of the camera and landed in a shell with root access.
NOTE: it was later discovered that the saving these environment variables is not recommended since these variables persist across reboots. So it's possible to create an invalid boot config and cause issues with booting. Instead I used setenv bootargs ${bootargs} init=/bin/sh and then run bootcmd to get a shell with u-boot.
With a root shell I could manually hand-hold the camera's startup process, but it would be easier to let the camera start up and mount it's partitions and configure everything and then log in through the normal boot process. We can create a backdoor by updating the credentials for the root account to a password we know.
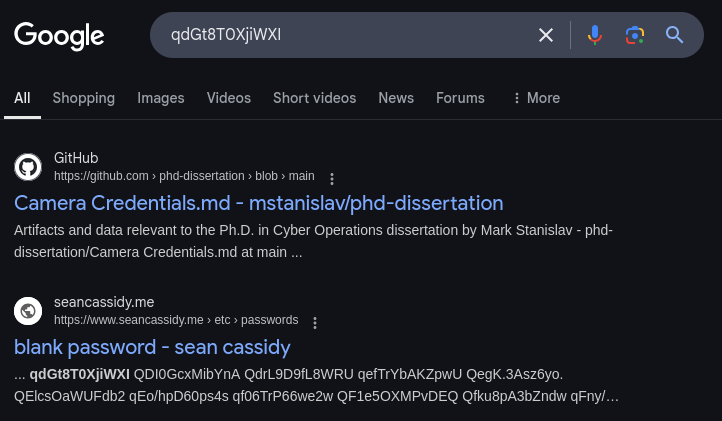
I sifted around the file system and looked in the /etc/passwd file to see if the password I couldn't guess was there in plain text. There was a hash of the password and typically you can find these passwords online in their unencrypted form if someone has decrypted it before.
Thankfully this password hash was known to the internet as a hash of a blank password.

I had initially tried modifying the squashfs /etc/passwd file to uncomment the line with the blank password by binding it to a directory mounted in RAM but was unsuccessful, nor did it persist across reboots. So I decided to poke around the init process of the device.
It was time to start looking at alternative ways to get into the system, I started investigating the startup process by starting in /etc/init.d where a startup script /rcS resided. This script made some directories and setup some partitions but at the end of the script I saw that another script was being called from one of the newly created and mounted partitions
if [ -e /mnt/mtd/boot.sh ]; then
    /mnt/mtd/boot.sh
fi;
I checked out this new script and saw something interesting, the /etc/passwd file was being replaced by another one from one of the new directories.
mount --bind /mnt/mtd/etc/passwd /etc/passwd
What's happening here is the storage (eMMC) of the device contains a mock /etc/ directory that gets mounted to the squasfs file system, allowing the files on the eMMC to be modified and then the main filesystem redirects to this mounted filesystem. As a test I created a backup of the file in case modification caused any kind of boot / initialization issue.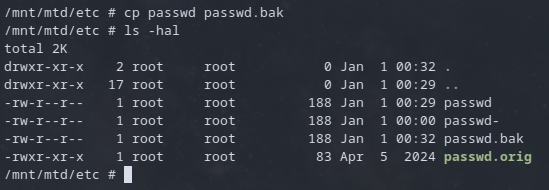
I was able to create a backup so this directory was writable. Looking at the passwd file iteself we see this is the account that has the blank password from before, so we should be able to do the same modification here and be able to login.
rebooting the device and getting to the login prompt. Using the root username and no password granted me access!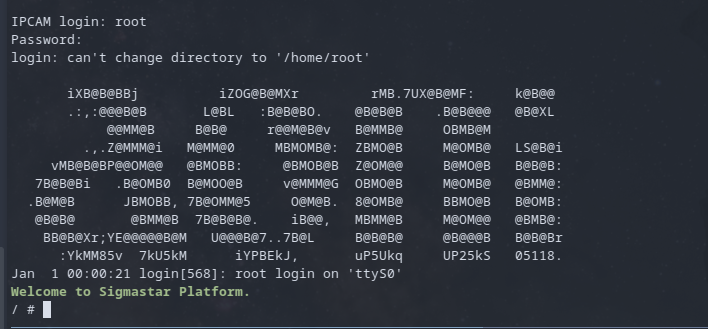
I went and checked my /mnt/mtd/etc/passwd file and noticed something odd. The login entry was now different and didn't contain the empty password hash. So something was updating this file. I wanted a persistent password-less login. I had to look at what was going on with this file.
Going back to the boot.sh file that gets called, I saw this line
The script is taking a backup file and replacing the passwd file before binding to the squasfs filesystem. So If I can update this file I should be able to replace the backup with my backdoor and the startup process will copy it over. During a couple reboots I noticed that there were checks of the files being called from this directory from a list. If I were to modify the passwd.orig file, the integrity check done by the init process would fail. All I needed to do was replace the hash of the old files with hash of my newly modified files.
There was a chain of authentication, the OTA_files_md5.txt file contains a hash of passwd.orig but then the OTA_files_sha256.txt file contains a hash of the OTA_files_md5.txt. This means that replacing the hash invalidated the check of the file I'm editing. Thankfully I have access to everything so I just update all the checks with my hashes.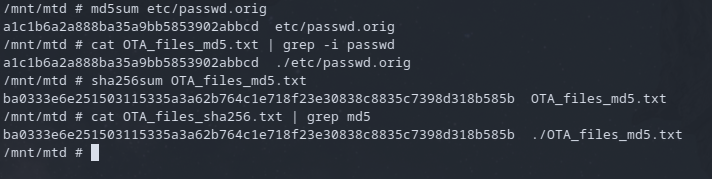
This allowed my to get a persistent backdoor through powercyces.
Now that I have control of the device and know how the initialization process works, it's time to give this device some personalization. I decided to edit the message of the day that pops up when you first log in. To do this I leveraged the bind flag that was used for the passwd file in the boot.sh script.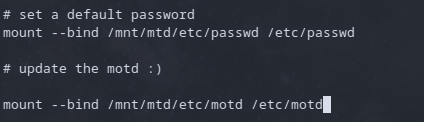
But now with the boot.sh file modified, it's entry in the OTA_files_md5.txt was invalid so I just needed to update everything again.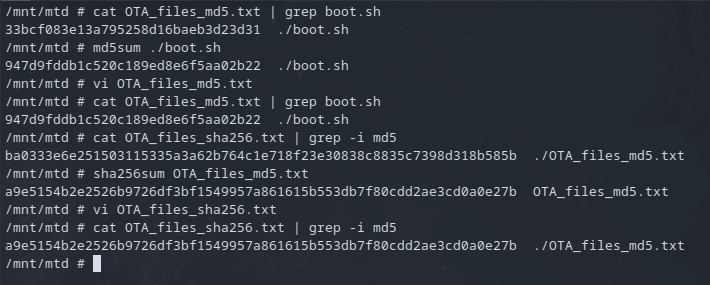
With this backdoor and new motd, I was able to leave my mark on this device.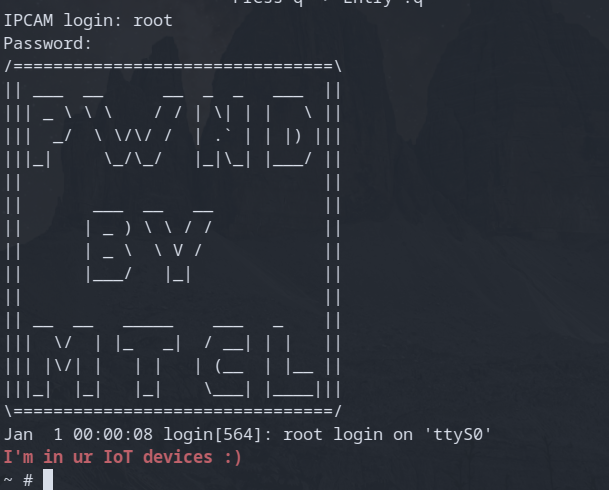
With the device under my control I want to investigate how the device operates with WiFi. Since this is a camera, getting a hold of the video stream without any need for authentication would be a fun endeavor.